Table of Contents
Here we will be talking about installing a new Operating System on your machine. Here is a basic guide with limited technical terms. All the terms are explained to understand what is actually happening. Every system have different buttons (F1 – F12) for some functions so you need to know your system model to continue the guide. Here we will try to explain all the problems during booting a new system. Here is Ultimate Guide to Boot new System.
What is Operating System?
Operating System is a Special Software with several set of instructions that primarily serves as a connection links between computer hardware and application software. Application softwares are those you interact with (Browsers, Text editor) and Computer hardware are the physical devices. OS first loads in the system and manages resources.
Functions Key (F1 – F12)
The function keys or F-keys on a computer keyboard, labeled F1 through F12, are keys that have a special function defined by the operating system. These keys have some special functionalities during compute boot (When machine turned on). While booting functionalities of f keys could be:
- F2 = BIOS setup
- F8 = Options for “safe mode”
- F12 = Boot Menu
Bootable USB
A boot device is any piece of hardware that can read or contains the files required for a computer to start. So, a bootable USB contains its own operating system ready to load. With bootable device you can load a OS into your computer.
You need to have ISO of the operating system to create a bootable media. You can create bootable DVDs, CDs, but as using USB is common and flexible and would be fast so we would recommande booting a USB. To create a bootable USB you can make use of softwares like Rufus and UNetbootin.
Download the ISO file of the Operating system you want to install from their official site. Then Download Rufus and follow the guide to boot your usb. It is a simple process. Select the ISO file and select the USB drive and “Ready”.
UEFI and Legacy Boot Mode
Legacy was the number one boot system for the past 25 years. UEFI is a new mode of Boot options which is replacing the Legacy. UEFI are available on every new systems being creates where as Legacy is still supported. We will be using UEFI to boot our system.
- UEFI boots faster than Legacy systems.
Functionality, adaptability, and speed are the major factor we will be using the UEFI over Legacy.
BIOS setup
In BIOS option you can select UEFI or Legacy Boot mode. Enable function key for boot menu and set boot priority order. You can be on BIOS option pressing the f2 key during the system first start. Press release – Press release …. the F2 key when you turn on the PC and there is logo of your device manufacturer.
Now you will be in the BIOS option, there are some sections Information, Main, Security and Boot. There may be some difference but these are the sections in the BIOS menu. Some device disable the Boot Menu (F12) so you need to Enable the boot menu. From the Main section you can Enable the BOOT menu
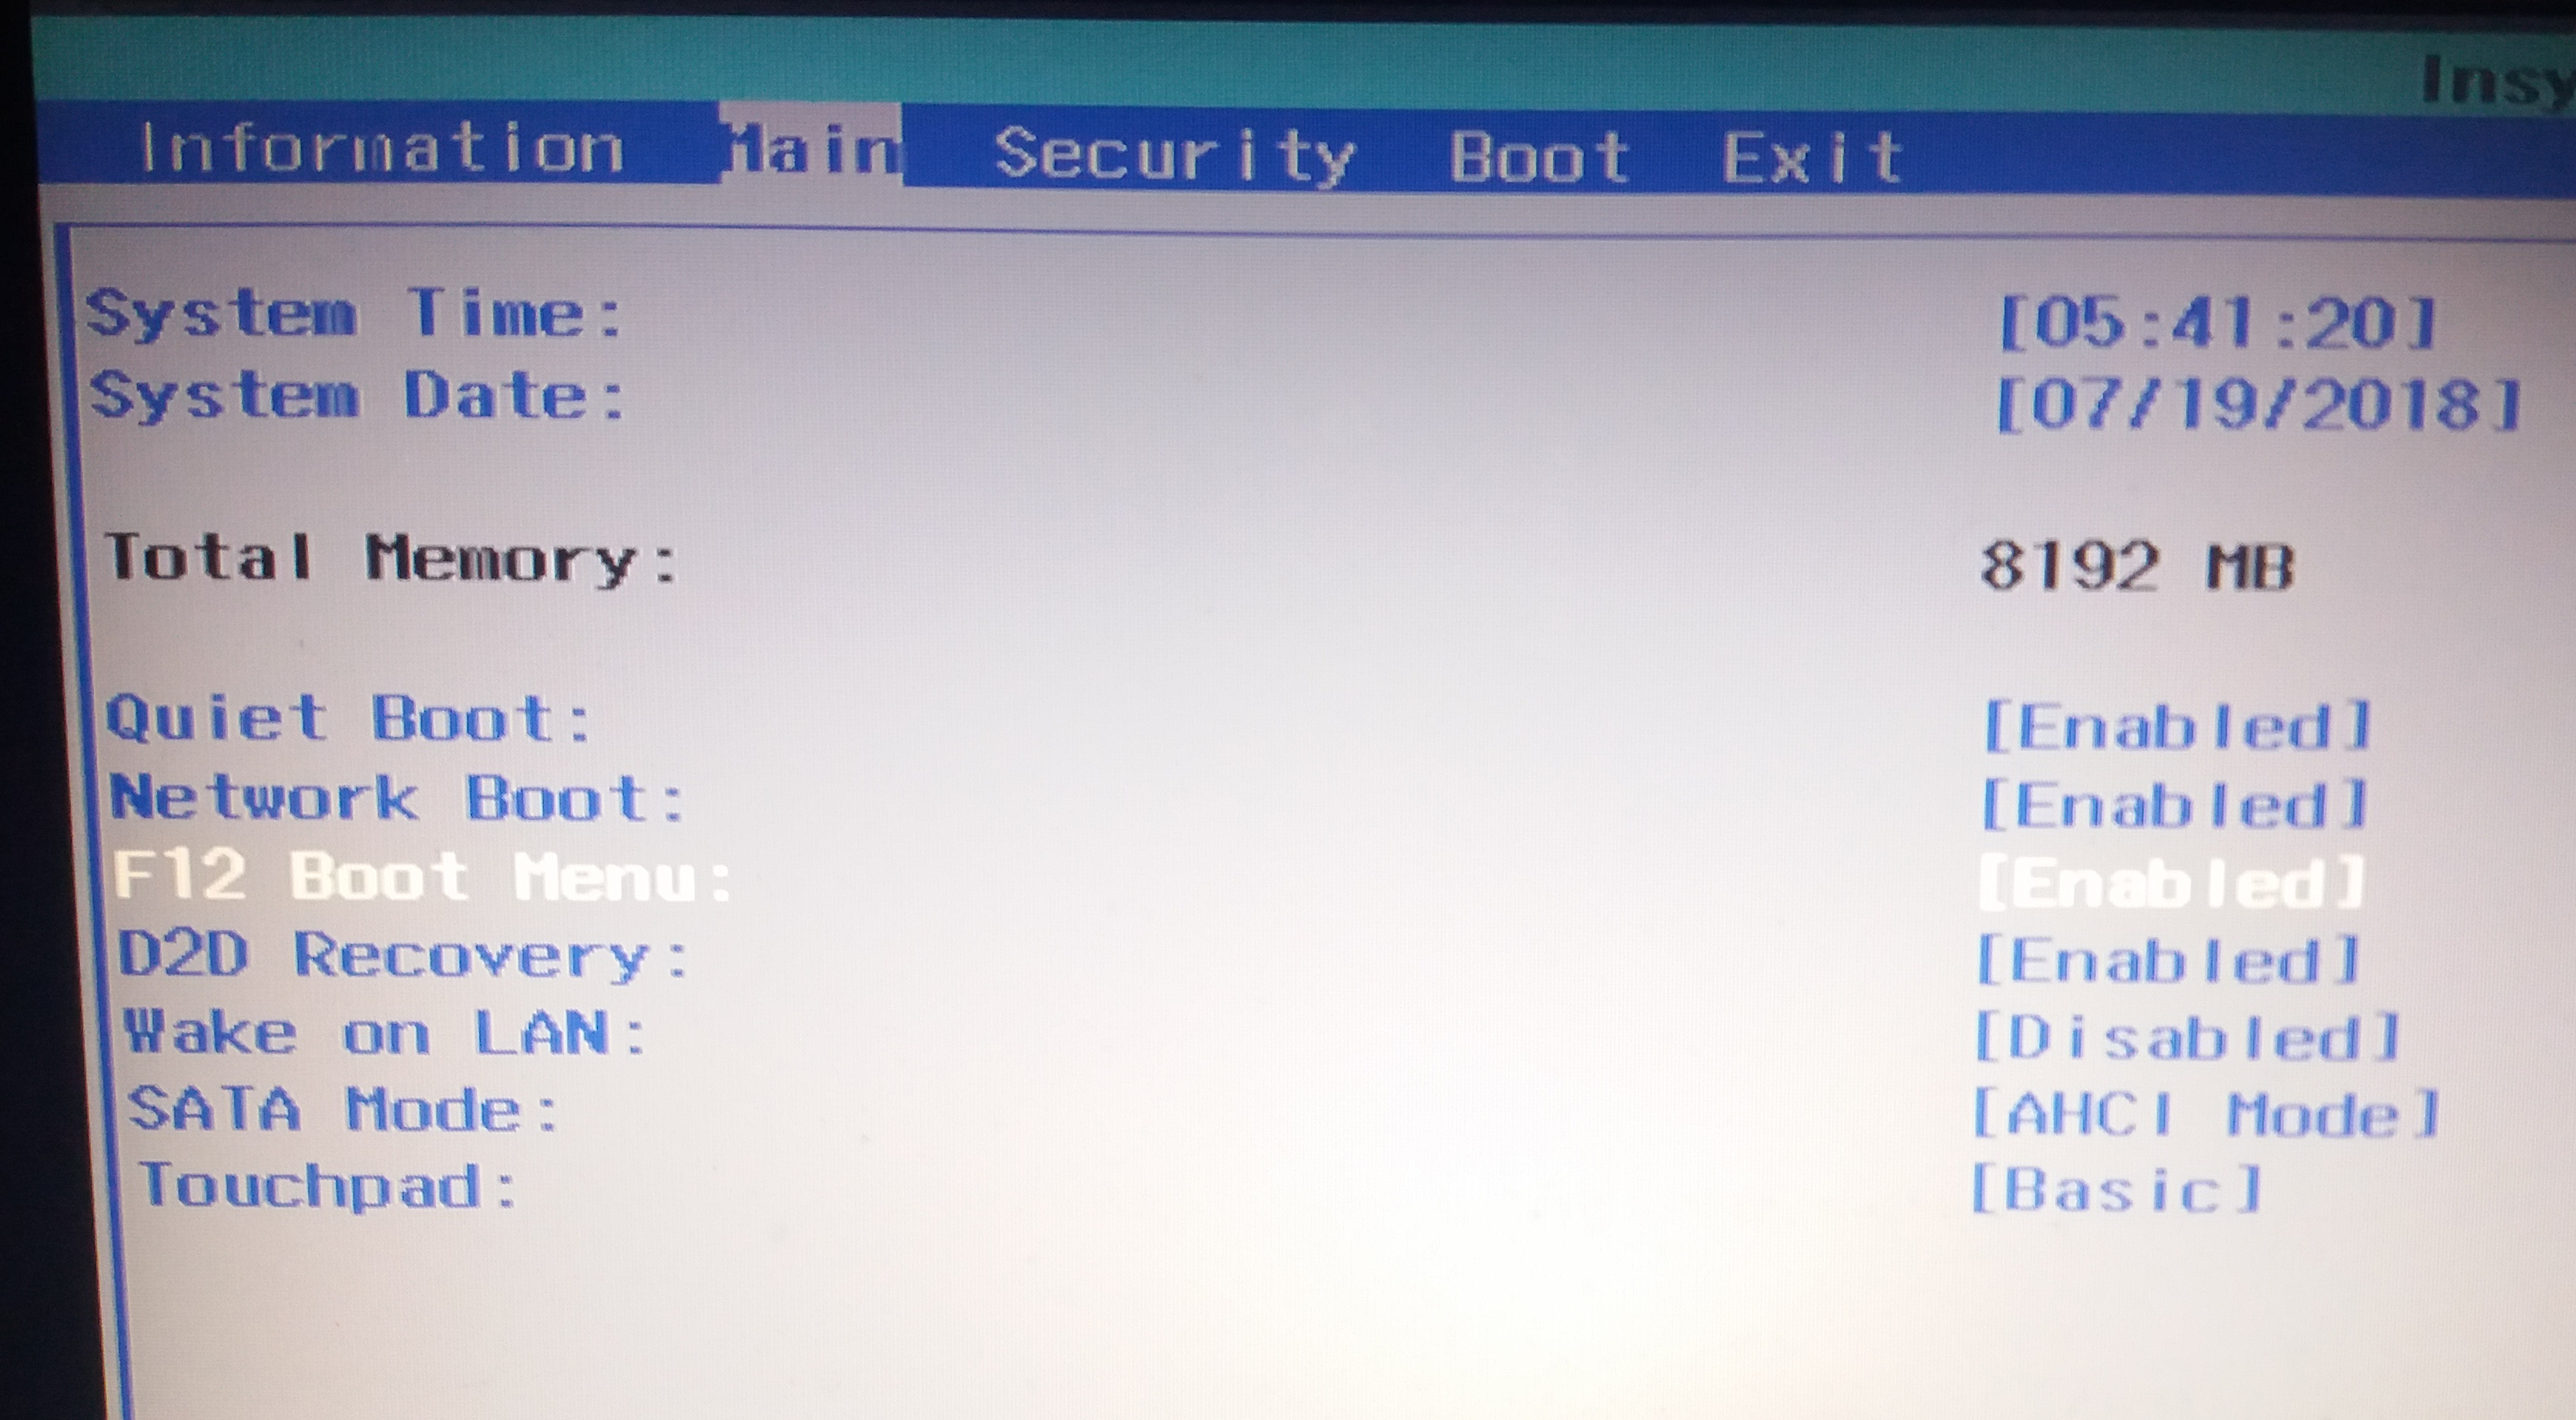
Now save and exit. Go to exit and select Save and Exit. Now you can press the F12 to find the boot menu from where you can select the OS in your bootable USB.
Select the BISO Boot mode. Go to the Boot section and in Boot mode select the boot mode you want.
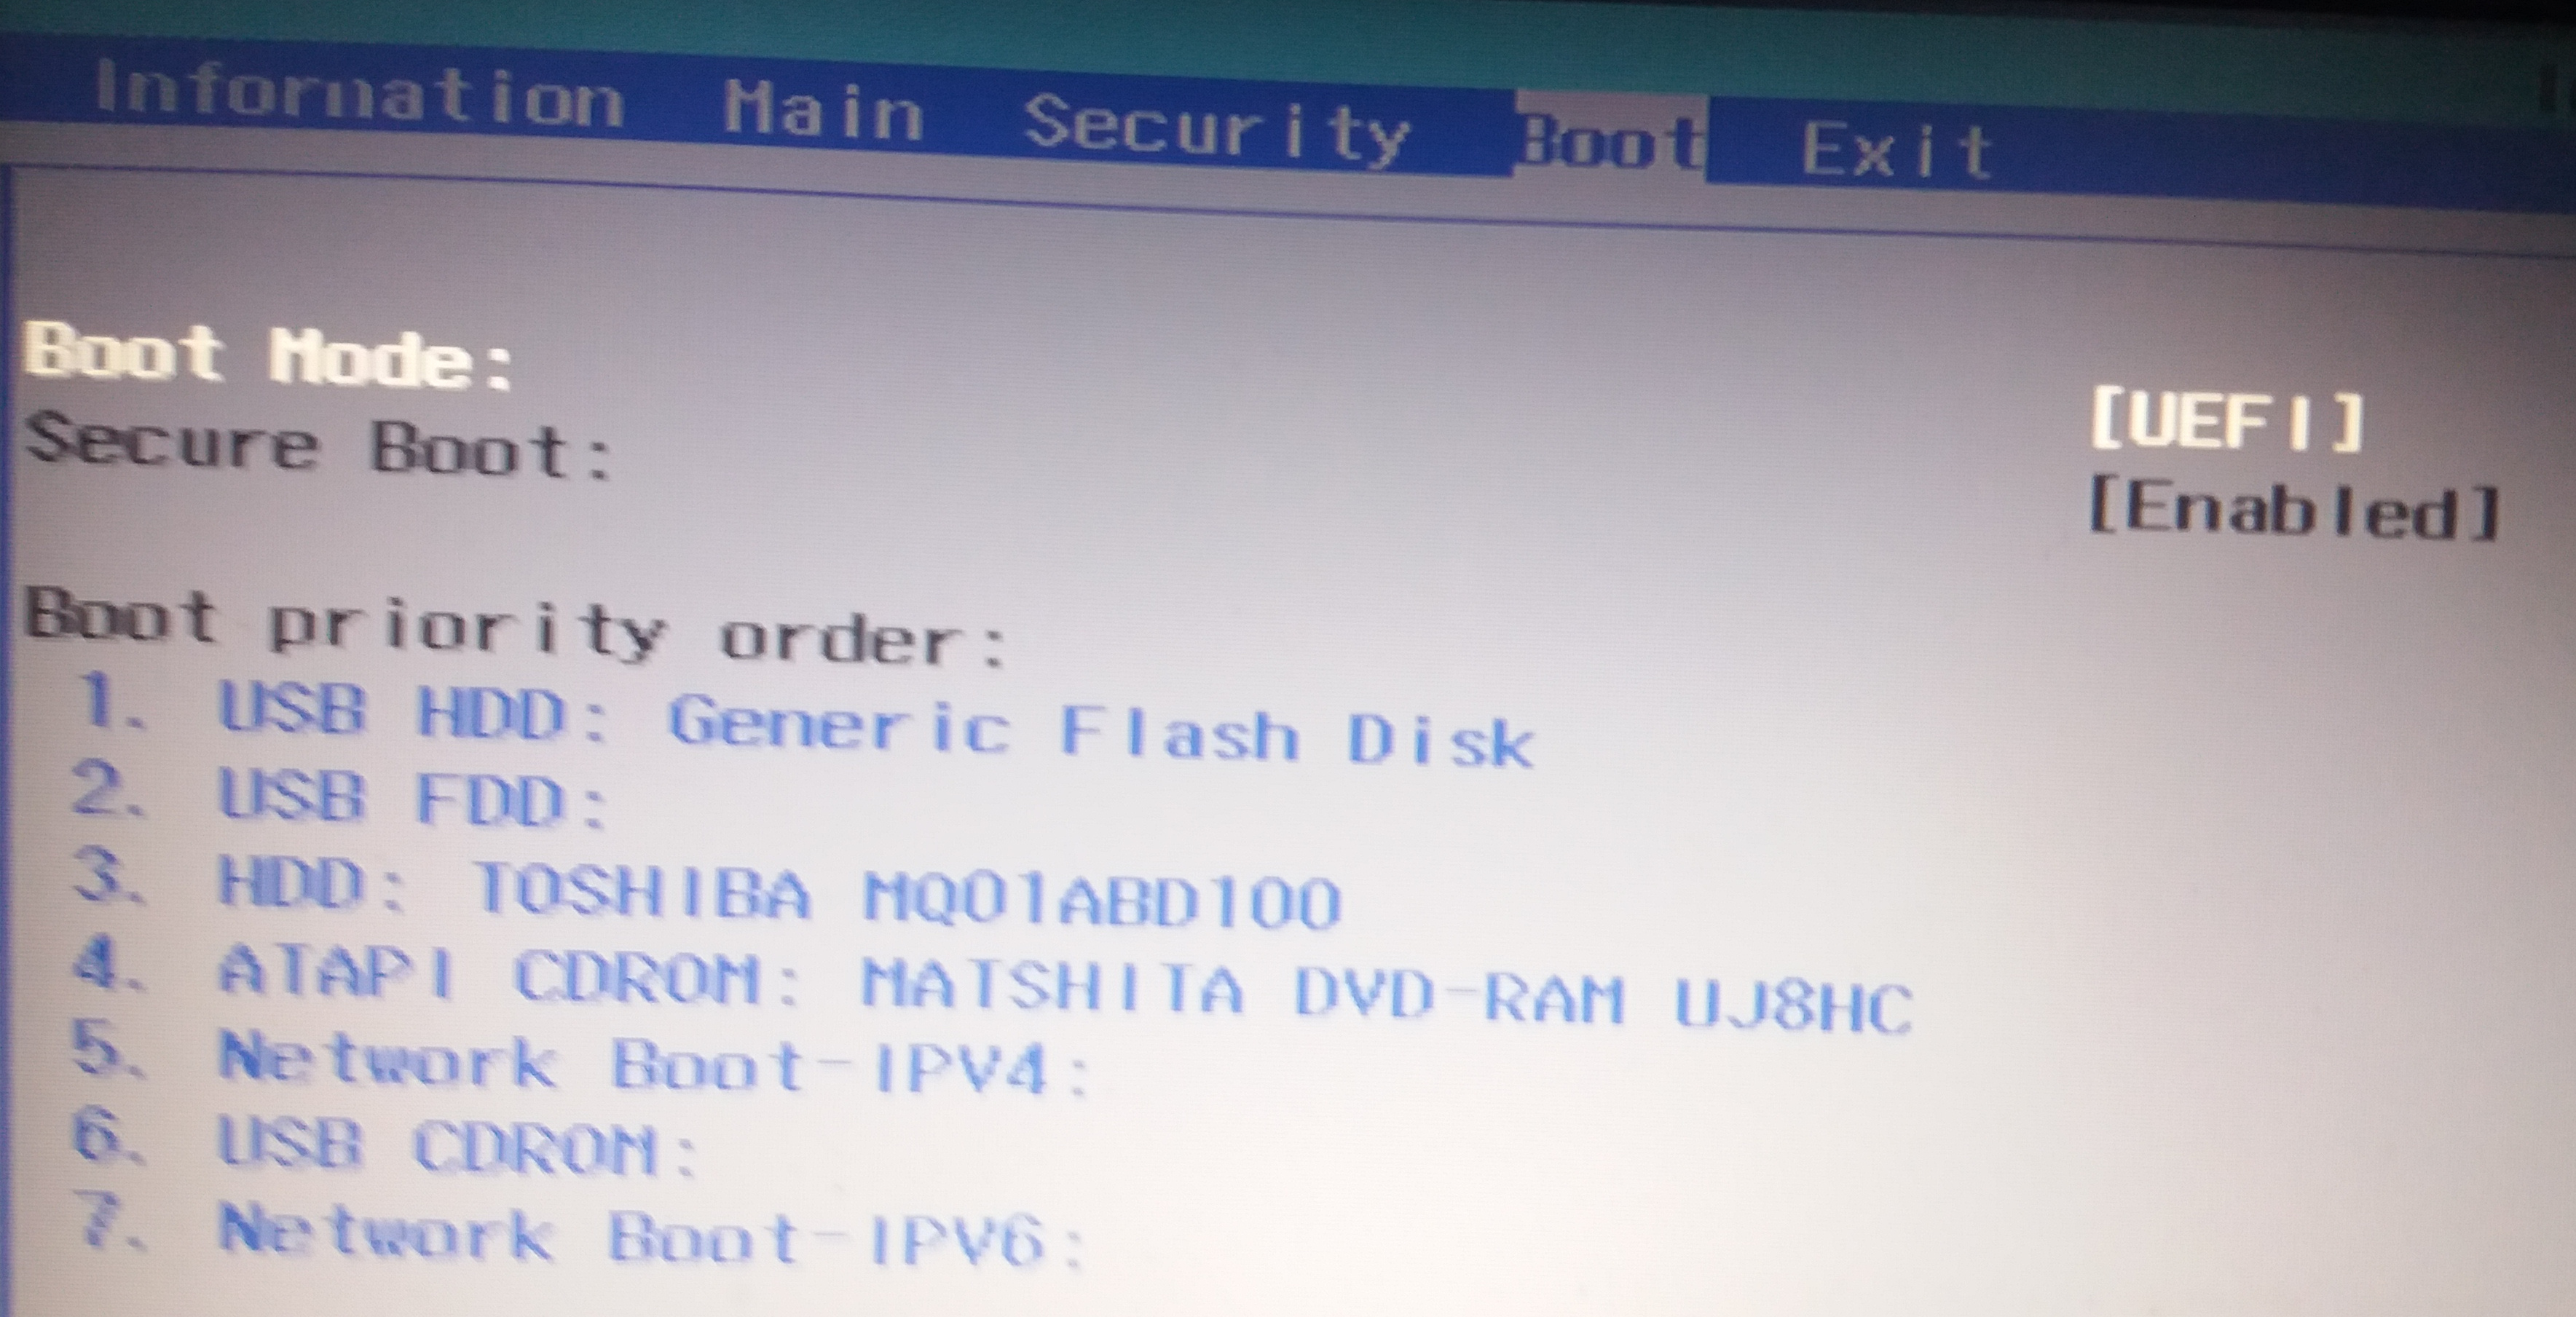

Now set the Boot Priority order, As we are booting from the USB we set boot priority order to first, Doing so if we insert the bootable USB and start the machine, it will detect the device and ask to boot to the USB. Or you can simply press the F12 Button to get list of boots available. If you select the HDD it will boot to the current OS, as it is installed in the Hard Disk Drive.
Install the new Operating System
Now when you insert your Bootable USB drive it will automatically boot you to the OS from the USB. If it still boot to the Installed System you had not set the USB option as first in the Boot Priority, that’s fine, you need to press the F12 button to get to the boot menu and select the USB.
Before getting started Please Back Up your System.
Now you will see list of Devices (the HDD and your new bootable USB) selecting the HDD will load the operating system you had currently installed. Selecting your USB leads to the installation process of that new OS in your USB. Select it and wait until you need to select some options (Language / Timezone / Keyboard Layout) Select based on your choice. Accept the terms if any and you will be finally in the main section of Installation How to install and where to install.
Now select the options for your System. At some point you will be on Install this system only / Upgrade the System / Install along with the old system.
Installing the new System only will clear all the data from the old system. Upgrading will keep your personal data but will remove all installed softwares. Where as installing along side with the old system makes Double boo which we will be explaining soon.
Disk Partition
This is the section where most ot the new users stucked. In Disk partition manages you you can find all the partition in the system. If you want to completely remove the previous installation, you can clear (Format) the root directory. and install the system in that partition.
For Windows
You need to create a partition where you windows will be installed. Windows will automatically create other System Reserved partitions. You can create other partitions as required. You can give 60 – 100 GB for the C(Where windows will be installed) and divide the remaining to two Partitions.
For Linux
You need a Swap partition, minimum size as of your physical memory. (If you have 8 GB RAM, you should have 8 GB for Swap), create a EXT4 partition format to install the root of the system.
GParted
GParted is a great Graphical tool to manage the partition of the hard disk. You can download the ISO of the GParted and make your pendrive bootable with that iso and use the live USB to boot to the system and manage the partition of the hard disk. The best thing about GParted is that you can alter the partitions and view how it looks and apply to conform.
Dual Boot
Installing more than two Operating system in a system is considered as Dual boot. If you have dual boot in your system, when you start your machine it will ask which system to boot. If you are planning to install Linux and Windows both. First Create the Bootable of GParted, boot using this live disk. Create a Swap partition, one EXT4, and at least one NTFS for windows. You can create other NTFS as this partition can be accessed from both Linux and Windows.
Then first install the windows machine and only linux. If you install linux first and Windows at second windows will cover the Boot option of Linux and you will ended up using the windows only, there is no easy options.
Q. I have two Operating System installed but there is no option to select the OS to boot, it Ended up starting only one?
There is one Solution to this problem and That is Boot Repair Disk.
Boot Repair Disk
Boot-Repair is a simple tool to repair frequent boot issues you may encounter. Like when you can’t boot Ubuntu after installing Windows or another Linux distribution, or when you can’t boot Windows after installing Ubuntu, or when GRUB is not displayed anymore (Select OS option). You can Download Boot Repair Disk from sourceforge.net. Create Bootable disk using the ISO file. Run this USB and this system will check your boot options and suggest Repair, click in Recommended repair to fix.
How to Remove Linux From Double boot With Windows
No Bootable Device
If you get error No Bootable Device for your running device, the problem could be BOOT Mode had been changed. If your system is installed in Legacy mode you cannot access that system if you make you boot mode to UEFI. so if you get this error on your running machine you should check the boot mode and verify if it is same when installed or not. You can try using the Boot Repair tool if Boot mode is same.
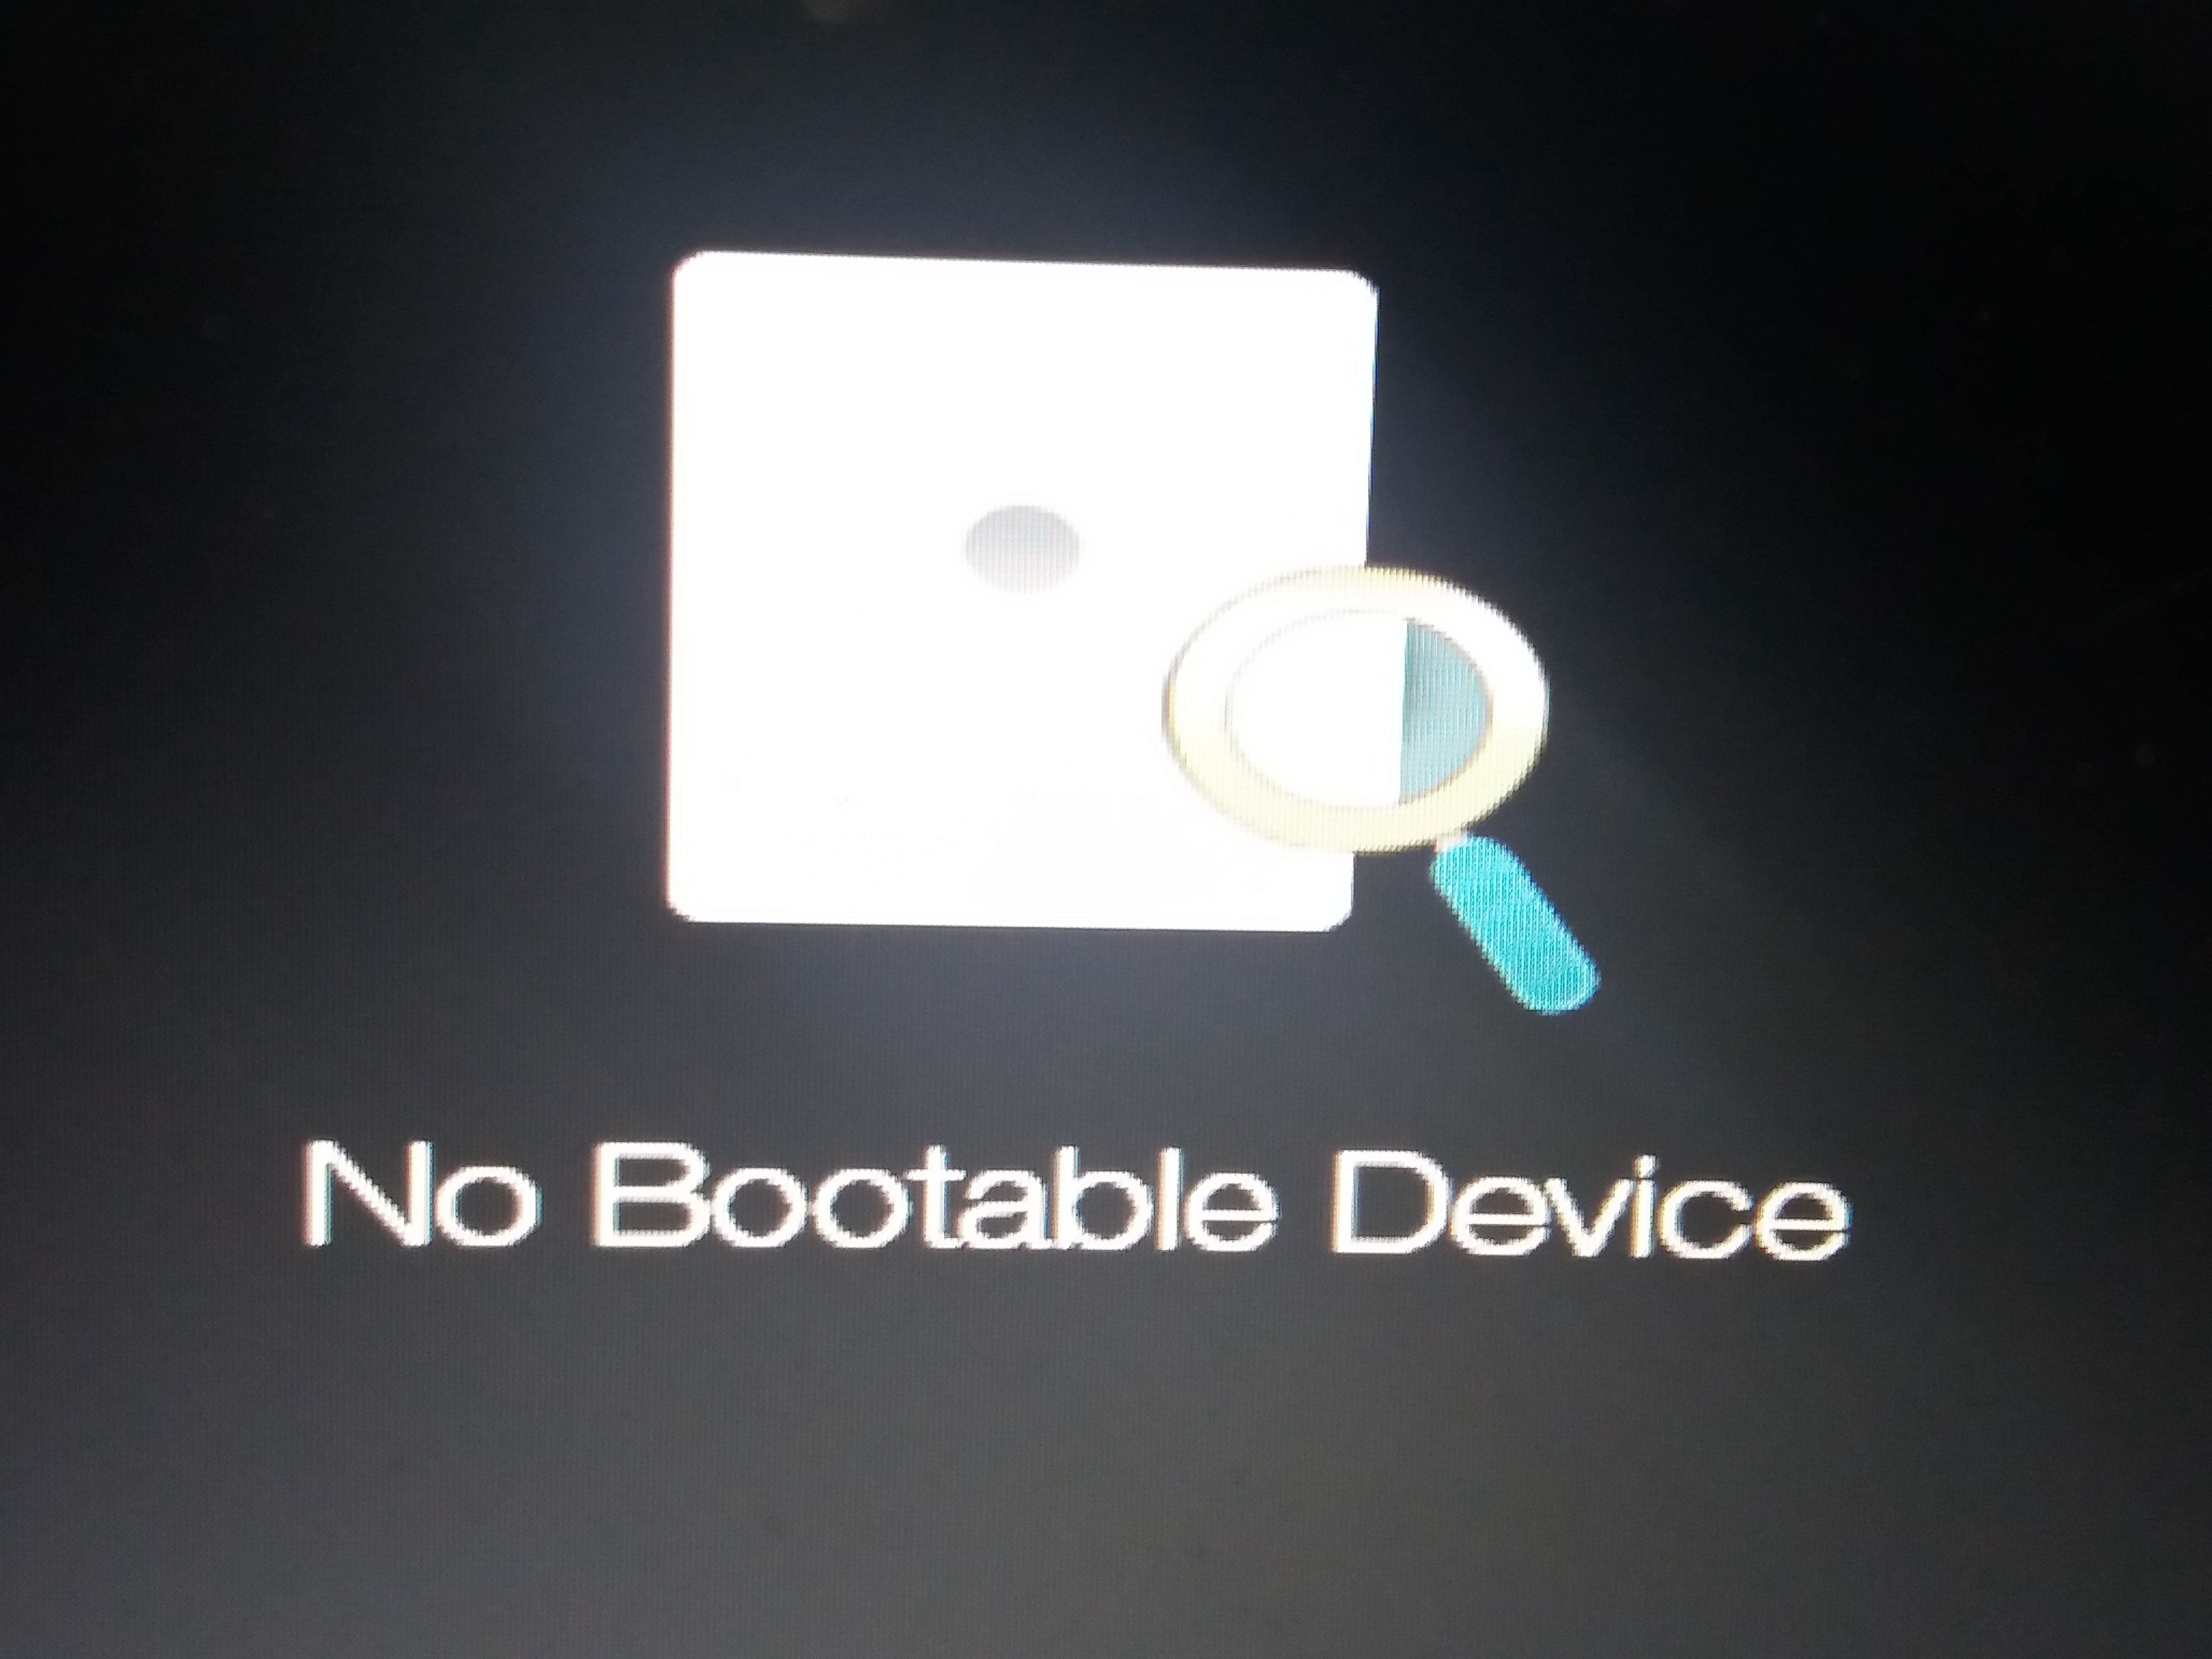
If it is your bootable USB and it is not detected, the issue could be your pendrive File format. If your pendrive file system is NTFS or any other then FAT, it is not detected (at least not accepted) by UEFI. The possible solution could be to install the system in Legacy mode or create the Bootable USB again with FAT file system. Remember UEFI is better than Legacy.
Encountered an Unexpected error Windows Installation
While Installing Windows if you get the error “The computer restarted unexpectedly or encountered an unexpected error. Windows installation cannot proceed. To install Windows. click “OK” to restart computer, and then restart the installation” There is some error in that system and you can fix this issue.
When you get this error press Shift + F10. this will open Cmd, now enter “regedit”, we need to alter some value in the Register Editor of windows.
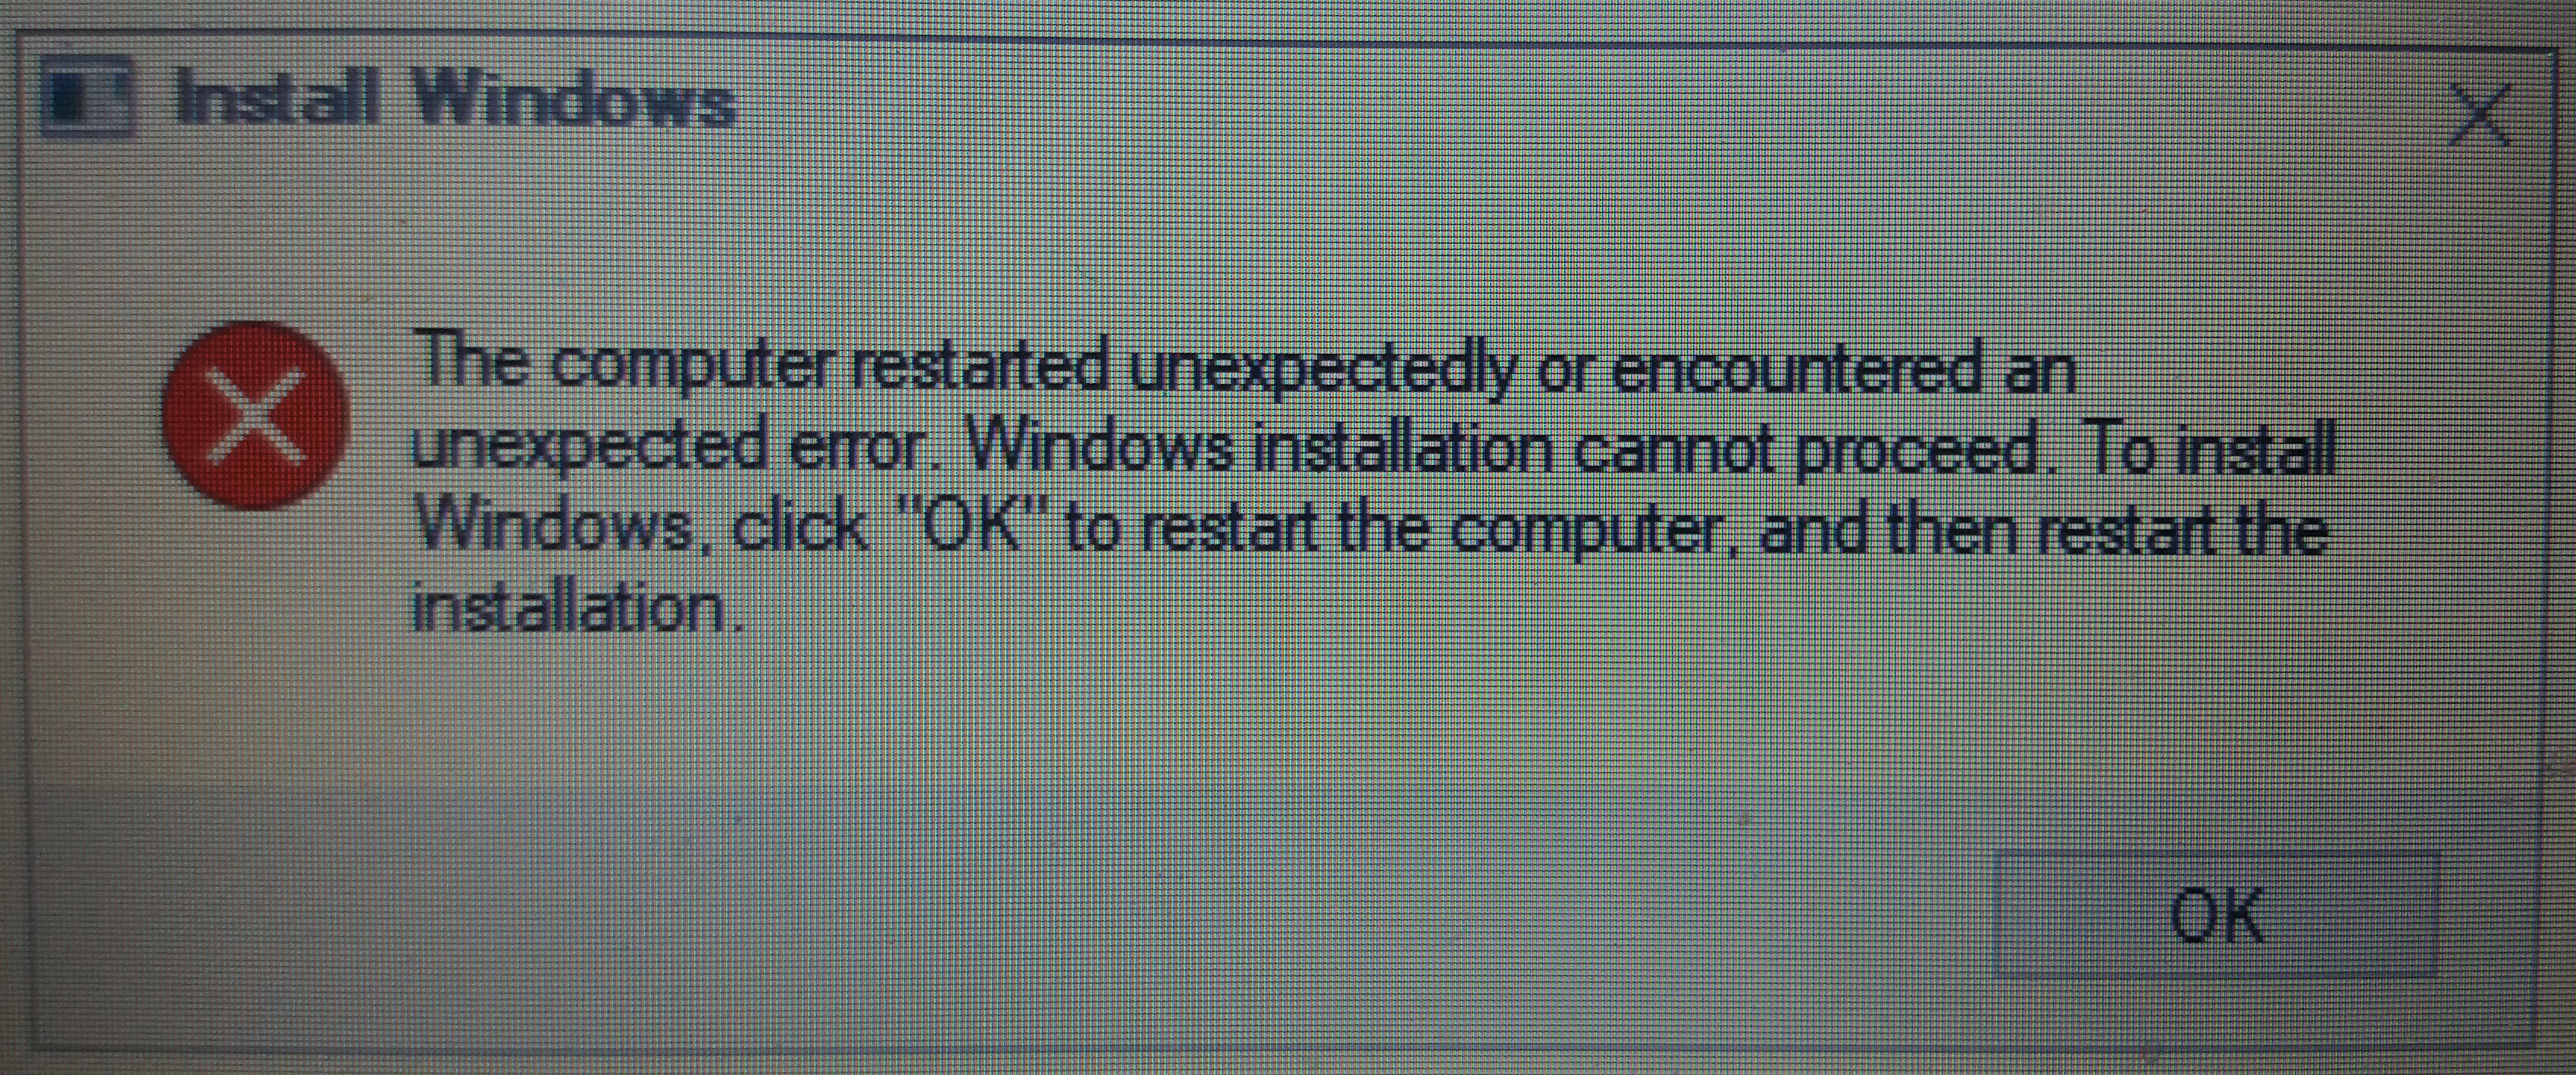
Now Register Editor is opened. Navigate to
HKEY_LOCAL_MECHINE/SYSTEM/SETUP/STATUS/ChildCompletion
In the right-hand side double-click on setup.exe. If the value is 1, change it to 3.
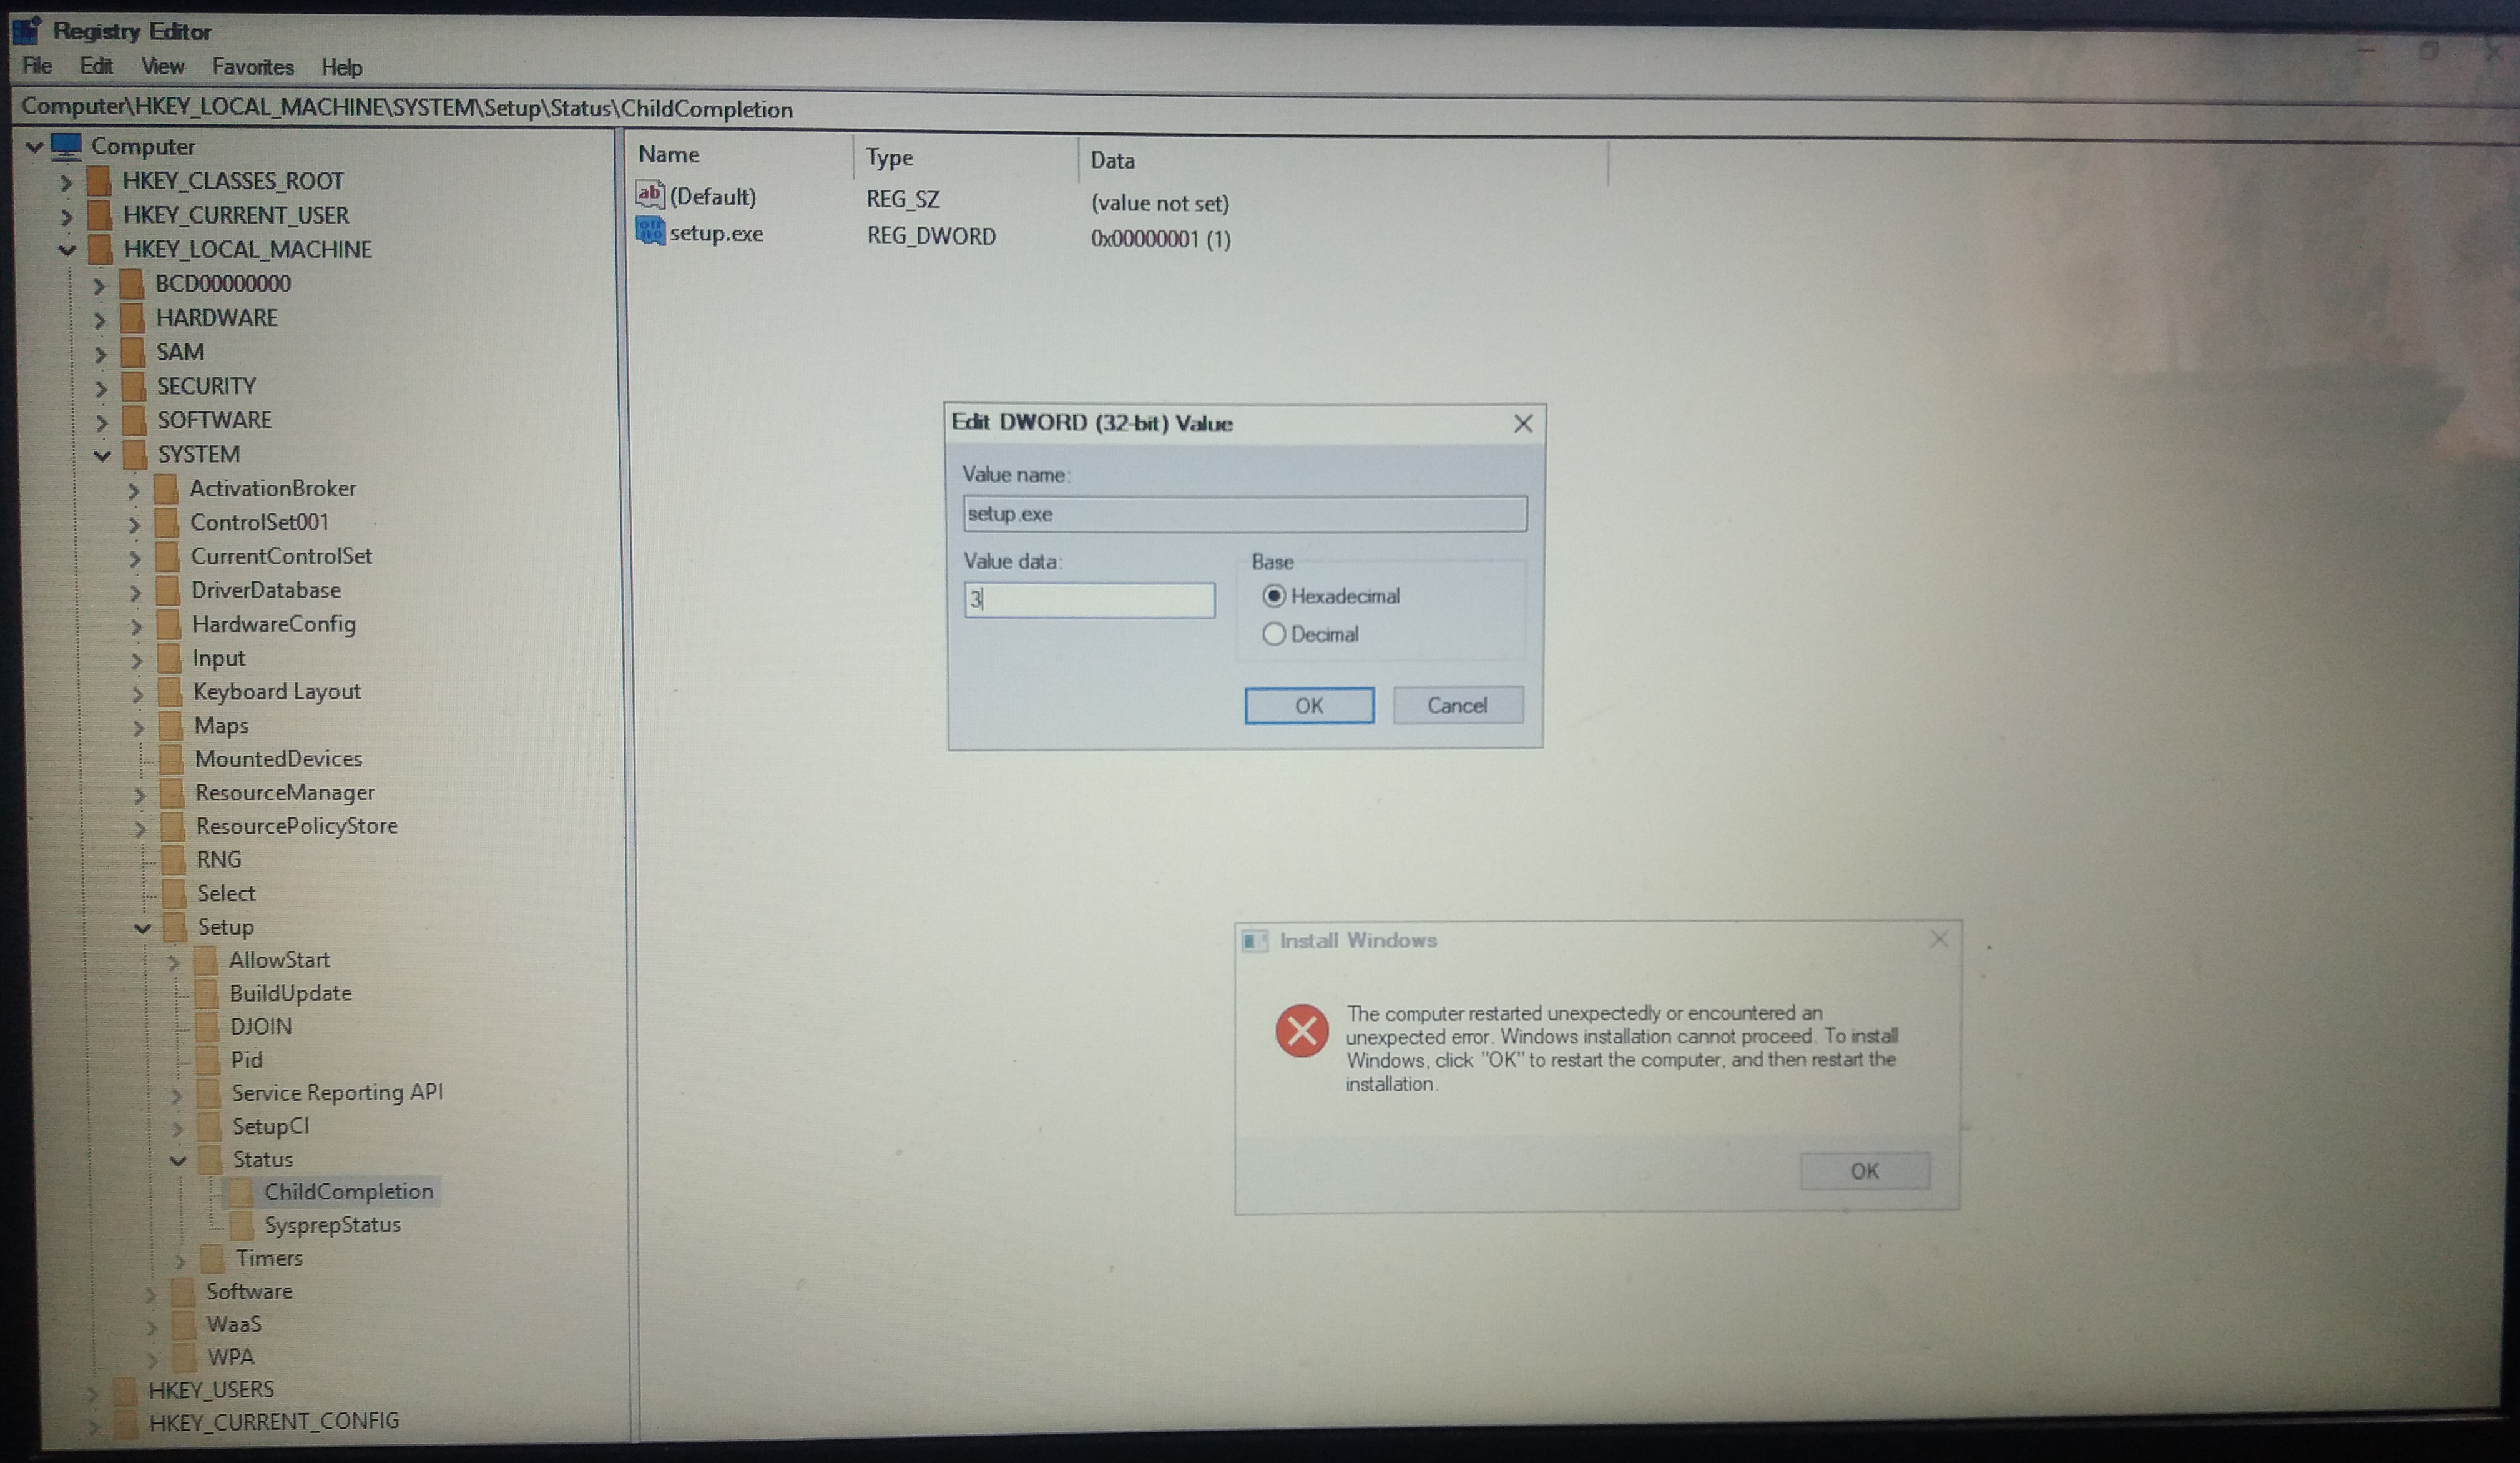
I don’t know how this solve the problem but it do. Enter the Value 3 and Click OK. Now restart the machine and you are good to go. Your installation process starts.
Conclusion
Here is basic guide to boot new system to the machine, we learn how to create new bootable USB, how to fix some issues with disk partitions using live disk of GParted. How to fix some common and frequently occurring boot error. We learn about Boot mode and it’s alteration can stop our system to boot. We also mention a common windows installation error.

This is Sagar Devkota Co-Founder of Time and Update. I write about Online Earning, Blogging, Web Hosting, Domain Registration, local technical news and some time about Cryptography. I also write about Git, Database, Java, Android, Linux (ubuntu). Studying Bachelor of Software Engineering.